In this blog you will learn,how to make a Arduino on breadboard
you can make a standalone arduino on breadboard by using your Arduino atmega IC or you can buy a new IC which has preinstalled arduino boot loader, If it has not preinstalled arduino bootloader then you have to install arduino bootloader which is compatible to your IC.
To learn how to load bootloader to your atmega IC click on this Link, If you are using IC from your arduino then you don't need to load bootloader to your IC because the bootloader is preinstalled in it, so you can start making arduino on breadboard.
To learn how to load bootloader to your atmega IC click on this Link, If you are using IC from your arduino then you don't need to load bootloader to your IC because the bootloader is preinstalled in it, so you can start making arduino on breadboard.
you will need some components to do this experiment
Components-

Atmega Ic run on constant 5-volt power supply, So use a 5-volt voltage
regulator (7805) to deliver constant power supply to your
microcontroller, Remember to use 7-12 volt power supply as a input of voltage regulator, voltage lower than the 7- volt as a input of voltage regulator can't generate a constant 5-volt output.
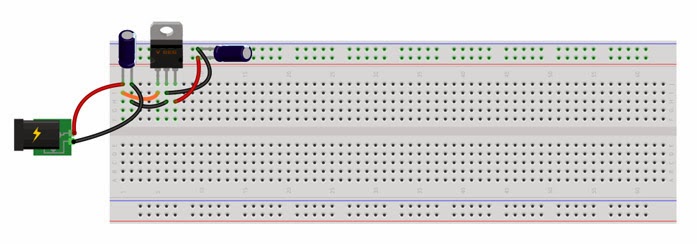
Now follow these instruction to add voltage regulator to your circuit-
- Add the voltage regulator to the breadboard.
- Add 10uf capacitor, One at the input and another at the output of the regulator as shown in the figure below.
- Now add 7-12 volt DC power supply at the input of the voltage regulator as shown in figure below.
To check your regulator circuit take voltage reading with the help of your voltmeter, If the reading on your voltmeter is between 4.9-5.2 volt then your circuit is correct.

Beforre adding atmega IC to your circuit, upload led blink program to your IC by connecting it to Arduino.
Remember that the pin configuration of your IC are not similar to the arduino pins,See the image below I found it on google, which shows the pin relation of your IC and arduino, This figure is also valid for atmega 328 IC.

Now follow these instruction to add Atmega IC -
First remove the power supply from the circuit to safe your IC from the silly mistakes.
First remove the power supply from the circuit to safe your IC from the silly mistakes.
- Connect +ve 5-volt supply to 20,21 and 7th pin of the atmega IC.
- Connect ground to 8th and 22th pin of the atmega IC.
- Connect 10k ohm resistor between the 1st pin of atmega IC and ground.
- Connect 16 mhz crystal between the 9 and 10 pin of the atmega IC.
- Connect 22 pf capacitor, one between the 9th pin of the atmega IC and ground, and one between the 10th pin of atmega and ground.
- Add a push button, Connect one pin of the button to the ground and one pin to the first pin of the atmega IC.
- Connect a led, positive end of the led is connect to the 19th pin of atmega and now connect a 330 ohm resistor between the -ve end of led and ground.

After making all the connection you can add power source to your circuit,
now you can see the led is blinking.

From now, you can make a permanent circuit on pcb for your projects and upload sketch to your atmega ic by using Arduino.
Hey guys, thanks for reading my blog.
I've made a chrome extension mYoutube for YouTube™. It is designed for a more comfortable watching experience.
✔ Instant control over volume by scrolling mouse wheel on the video.

✔ You can permanently disable video Annotations.

✔ Read Comments, see Related-Videos and Info without leaving video from sight.

✔ Auto turn off lights, when mouse stays more than 2 seconds on the video player.
Please take a look at it - mYouTube

Connect 10k ohm resistor between the 1st pin of atmega IC and ground.... or... positive??..
ReplyDeleteto upload more sketches, do I have to repeat the process over again?
ReplyDeleteto upload more sketches, do I have to repeat the process over again?
ReplyDeleteto upload more sketches, do I have to repeat the process over again?
ReplyDeleteHello, I'm new to this and building one myself, problem I'm having is I don't know what software or how to program the atmega168 chip for the LED display I want. Any help is appreciated! Thank you!!
ReplyDelete